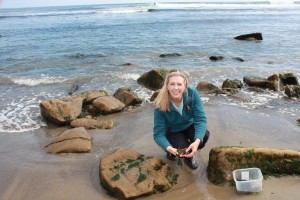
My name is Beth Powanda Shady. I am a nature lover and artist who’s lucky enough to live in Santa Cruz, one of the world’s most beautiful places. Ever since I was a child, I have been creating arts and crafts from objects found in nature– flowers, foliage, leaves, herbs, sticks, driftwood, seashells and seaweed.
I live with my seafaring, surfer husband Bill and our five kids.
Our quaint, beach community is celebrated for its temperate climate, pristine beaches,
rocky shores and surfing.
I created this blog a few years ago to write about the joy and pleasure I experience living by the beach. I moved here from the East coast 23 years ago and I am still in awe of the natural beauty that surrounds me. I want to share my love of the sea and coastal living with you.
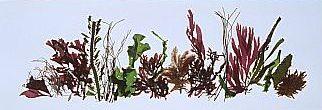
All of the seaweed used in my SeaweedArt cards has been sustainably harvested from the Monterey Bay in accordance with the regulations for seaweed harvesting along the West Coast of North America.
Press
See it in the sea, buy it on a card — Santa Cruz Sentinel, February 4, 2012.
Featured ocean advocate in SeaWeb’s Ocean Voices.
Our Mission
SeaweedArt is committed to raising awareness and funds for the protection and preservation of our beautiful oceans, beaches, coastlines and marine habitats. For every item purchases, 10% of the profits will be donated to charities and non-profit organizations dedicated to our cause.
The Process
The art of pressing seaweed dates back to the Victorian Era when aristocratic ladies made seaweed pressings as a hobby to collect specimens and decorate their homes. The process may seem daunting and time consuming, but I can assure you it is quite satisfying, peaceful and relaxing and you will be amazed at the beautiful works of nature art you will create.
How to Press Seaweed
Materials Needed:
- Seaweed
- A container for collecting, Tupperware with lid is best
- Tap water
- 100% cotton rag paper (available are art supply stores) Cut into standard frame sizes like 5 x 7 or 8 x 10
- Colander
- Two small dishwasher tubs. large pots work well too
- Tweezers
- Cheesecloth
- Paper towels
- Blotting paper (available at art supply stores)
- Heavy books for weights
- Fan
Step 1. Collect the seaweed. Rocky shores at low tide are the best spot. Look for seaweed in different colors, shapes and textures. Put the seaweed in a container filled with a bit of clean seawater. You should add enough water to cover the specimens and keep them moist.
Step 2. Take your seaweed home and put it in a colander and rinse thoroughly with tap water. Place in a dishwasher tub with tap water. This will be your sorting tank.
Step 3. Fill the second dishwasher tub half way with water. Place the paper in the water so it is submerged. Choose seaweed from your sorting tank and place on top of the paper. It should float slightly above it. Think about the result you want. The variety of seaweed’s shapes, colors and textures naturally lend themselves to beautiful abstract designs. Put your hands under the paper and remove quickly from the water. The fast movement should capture the fluid motion of the seaweed. Adjust with tweezers or your fingers if necessary. Tilt the paper from side to side to drain excess water and blot gently with paper towels.
Step 4. Place your design on a stack of blotting paper. Cover with cheese cloth and more blotting paper. The paper will absorb the excess moisture. The wax paper prevents sticking to the packing paper. Stack heavy books or weights on top. Set a fan in front of it on a low setting. Every other day change the packing paper until your paper is completely dry. This can take up to two to three weeks.
Step 5. Once your masterpiece is completely dry you can frame it. Seaweed has a natural glue in it that causes it to stick to paper. If there are some loose pieces you can glue them down or laminate your piece. Keep out of direct sunlight and the color should last a long time.


